
How to Mine THA
NOTA : DO not load /create more than 1 wallet per QT. Loading multi wallet or creating multi wallet can cause issues. Create shortcut or instances via CLI but never generate more than 1 wallet in QT.
Introduction
Welcome in How to Mine tutorial for THA. First of all, please try to read the complete tutorial. Not understanding what you are doing will conduce to the loss of UTXO. UTXO lost means you will have to send again TX to get new UTXO, losing the associated Fees.
Software Preparation
First of all, download the software and unzip it. You can use WinRAR or WinZip. Put the unzipped file where you want to store it.
Proof of Transaction (POT) Model
In the Proof of Transaction (POT) model, mining involves the interaction between two distinct wallets: a sender wallet and a receiver wallet. To effectively mine using POT, you need to set up both wallets. The sender wallet initiates transactions by sending digital assets to the receiver wallet. These transactions are then validated and recorded on the blockchain, contributing to your mining efforts. The process relies on the volume and frequency of transactions between these two wallets to increase mining power. By maintaining this active flow, you essentially boost your potential to mine more effectively, utilizing the inherent capabilities of the POT mechanism.
So now that you understand the need for two wallets. Let’s go creating two different wallets.
Setting Up Two Wallets
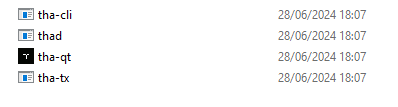
In the folder where you place the unzipped files, you should see:
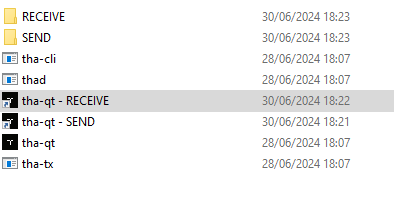
Click on tha-qt and create shortcut, 2 times. Create 2 folders that are named SEND and RECEIVE. This is what you should have now:

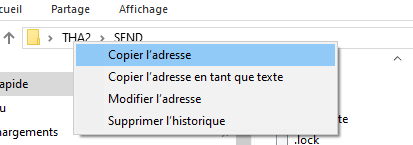
Double click on the SEND folder and enter in, right click on the path and select “copy path” (in your language, mine is FR).
Go back to the main folder. Right-click on the first shortcut. Rename the two shortcuts created with SEND and RECEIVE.
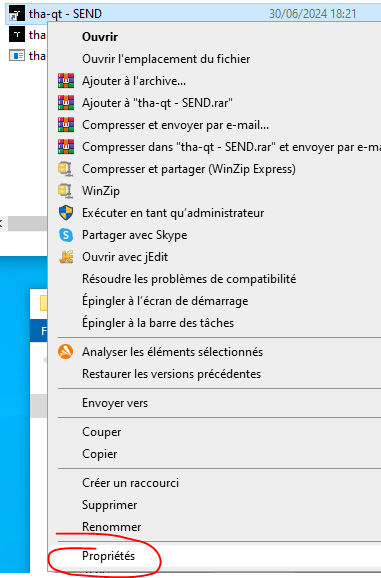
Right-click on the SEND Shortcut
Select “properties”
On the TARGET field, add at the end of the content, –datadir= and after the =, paste the PATH you have copied before. In my example it is: C:\Users\XXXX\Desktop\THA2\SEND. Means the TARGET is now: C:\Users\XXXX\Desktop\THA2\tha-qt.exe –datadir=C:\Users\XXXX\Desktop\THA2\SEND
(there are 2 times “-” before « datadir », the web interpreter of your navigator is making 1 of the 2, be careful to add: « – – datadir » without the space)
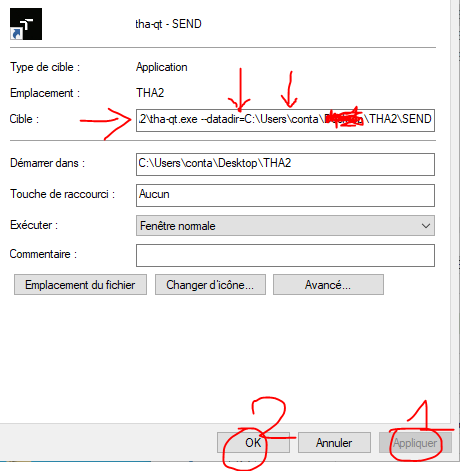
Apply the modification and click OK
Repeat the operation for the RECEIVE folder path and RECEIVE shortcut.
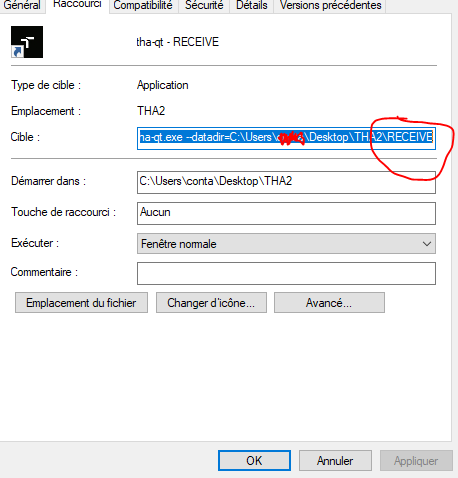
C:\Users\XXXX\Desktop\THA2\tha-qt.exe –datadir=C:\Users\XXXX\Desktop\THA2\RECEIVE
(there are 2 times “-” before datadir, the web interpreter of your navigator is making 1 of the 2)
Your path could be different from mine, depending on where you put the main folder.
Now, you have the tool for mining but before, take a look into the future. You will need some THA in order to mine because it is a POT. So you have to create or receive transactions. Most of the time you have to create the transaction (unless the person that sends you THA is sending you directly in many small transactions).
Preparation for Mining
According to this scenario, you have to receive your coins into the SEND wallet. If you do the mistake of asking for the coins on the RECEIVING wallet, just rename the folders and path on the shortcut.
So we will create first a receiving address on the SEND wallet. Double click on the SEND Shortcut.
Tips: If your wallet did not SYNC, click HIDE, hit Windows and CONSOLE. Then go to: https://explorer.tha-chain.org/network, copy a node IP address, then go back to your console and prompt this: addnode (paste the IP there) add.
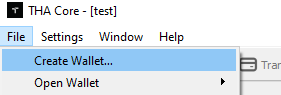
So now we are going to create the receiving address for the COIN you ask for. Click on File and Create Wallet.
Just name it SEND and uncheck the box (if they are checked) and click Create:
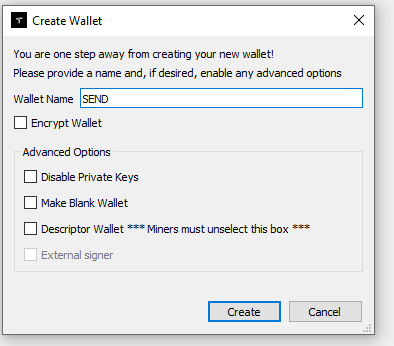
You could have a message that tells you Legacy Wallet type is being deprecated, don’t care about it and click OK.
Greetings! You created your first Wallet.
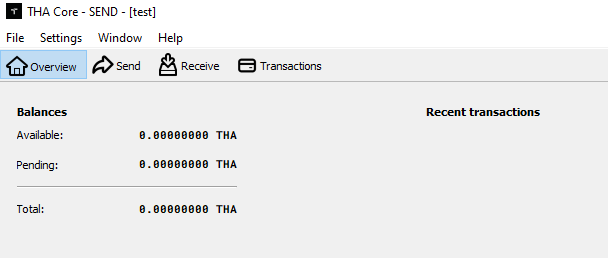
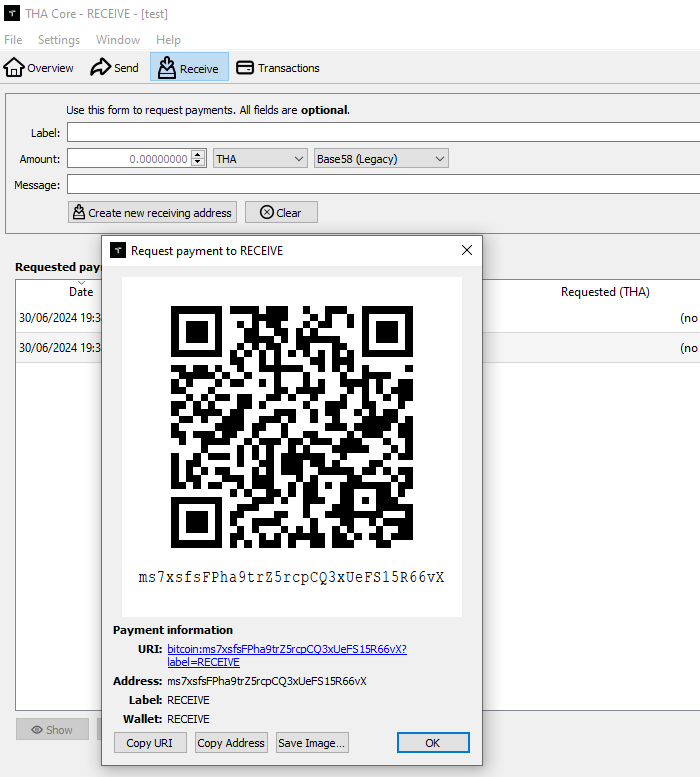
Now, we have to create an Address. An Address can send and receive. Click on Receive and Create new receiving address.
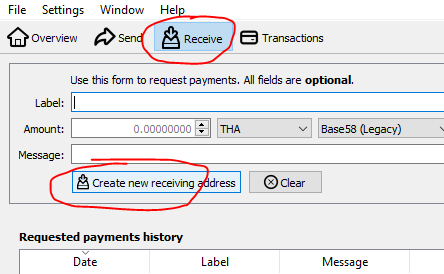
A window will pop with the receiving information:
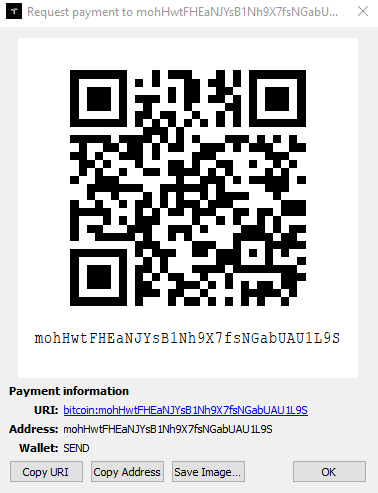
You can Copy Address but even if you miss it you can double-click it (or select and Show) or recreate any quantity of address you need.
Ask for your Coin on the mohHwtFHEaNJYsB1Nh9X7fsNGabUAU1L9S address you created!
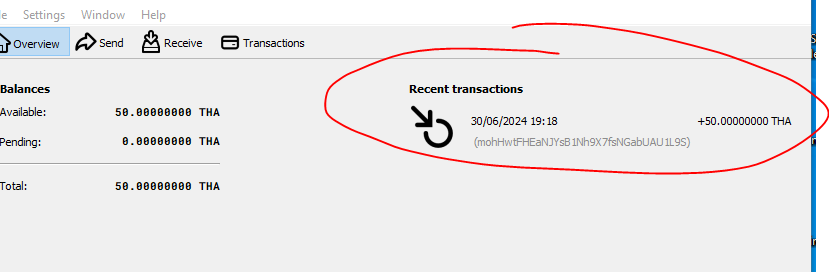
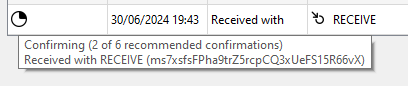
When your coins are sent, you will see them waiting for confirmation:
You need 1 confirmation to send them and 10 to mine with them. When you hit a block, you need 10 confirmations to send them.
Hit Transaction and see what the number of confirmations you have for this transaction:
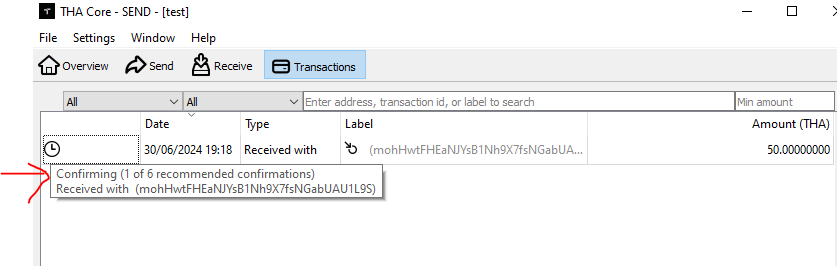
You can see there is 1 confirmation, you can send the coins. The 6 confirmation is to secure the coin you have received, when you buy coins, be sure there is at least 6 confirmations before paying it. So in our case, 1 confirmation is enough so we can start creating UTXOs.
Creating Minable UTXOs
Important: Be careful with UTXO management because each time you spend any value in a transaction, you will kill the original UTXO. It means that the UTXO of the 50 THA I am receiving, will be deleted if I use even 0.00001 of the 50 THA. Globally it is easier to understand that you should never use your MINING Wallet (RECEIVE) for anything else other than mining. Don’t send back coins or try to go and back this will just conduce to losing FEES. You need a Wallet for mining and wallets for whatever else. It is even better if on 2 different hardwares.
So now, still on our SEND wallet, we have to create minable UTXOs. Minable are UTXO with a value of equal or more than 0.1 THA (be careful about the fees). And UTXO for a TX of 0.15 or 0.2 or 5000 THA can be minable but the more efficient is to use 0.1 UTXO. You can send less than 0.1THA with the THA blockchain but those TX will not be usable for mining. That’s the POS part of THA and this is how we solve the unsolvable POS centralization problem.
Now, you can launch the RECEIVE shortcut, that will start a second THA wallet (at the same time as the first one) – if you have “an instance of THA is already running” it means you missed the first steps – and add node if needed to sync it. Create a Wallet named RECEIVE and a receiving address.
So I have now, my receiving address: ms7xsfsFPha9trZ5rcpCQ3xUeFS15R66vX
The TX can be sent, globally, in many different ways.
Go back to the SEND Wallet
First, you can send it via the dedicated windows, you can see the parameters:
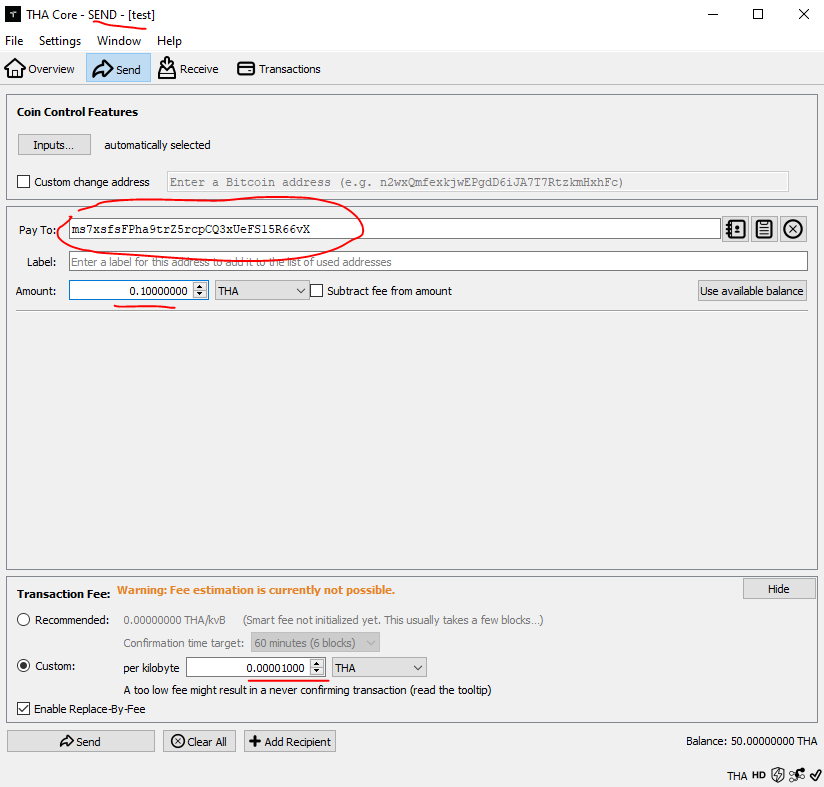
For the fee, let it @0.00001 and increase it if the mempool (you can see the mempool on the Explorer 2) is too much filled. Then click on SEND
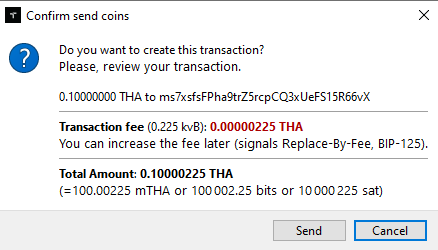
A confirmation popup and then wait for 3 seconds, verify all the data and click again send:
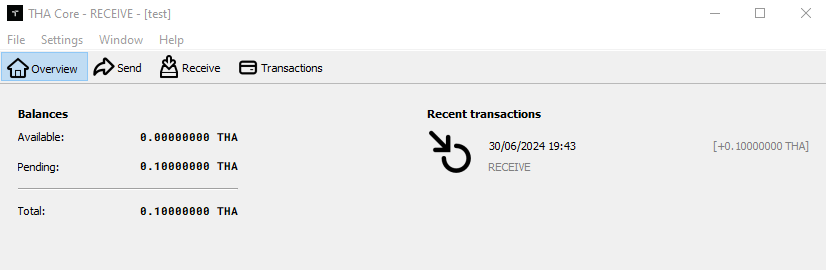
Now you will see the newly created transaction in the transaction windows of the SEND wallet:
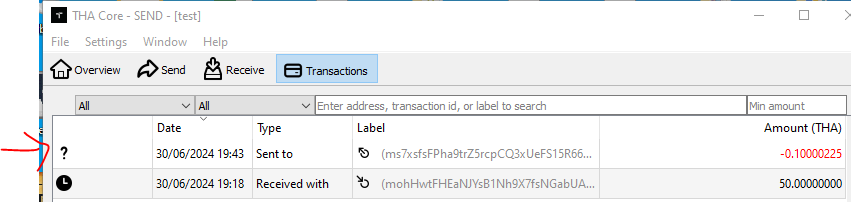
As in the overview of the RECEIVE Wallet (and later in the transaction too):
Repeat this operation as many as necessary for creating as many UTXOs you want. 1 UTXO = 1 Hash per second. If your computer is not older than 20 years, you should add 20 000 UTXO at least and on the last CPU, 20 Billions (per core). Hope you could buy 2 BILLIONS THA one day, but we probably never see a core occupied completely with THA mining!
The second method is to send TX with the console. Click on Window and console.
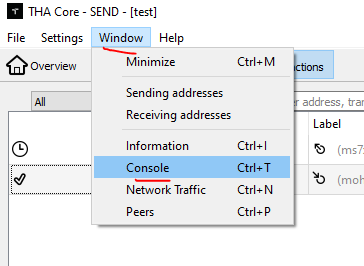
This will display you a new window where you can prompt or type instructions:
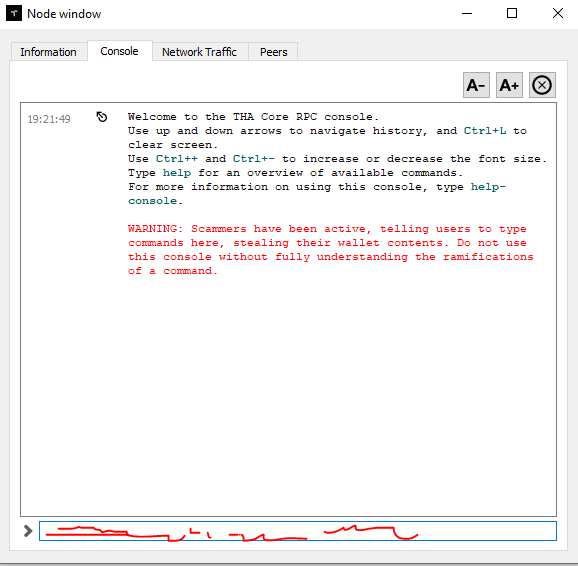
You can do many operations there and feel free to DYOR about BTC console, our commands are the same for 99%.
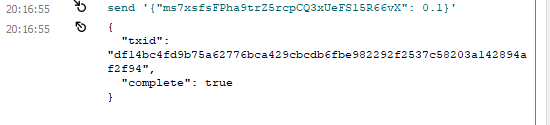
We can send with “send” command, like this: send ‘{“ms7xsfsFPha9trZ5rcpCQ3xUeFS15R66vX”: 0.1}’ Where ms7xsfsFPha9trZ5rcpCQ3xUeFS15R66vX is my receiving address and 0.1 the amount.
If you have this message: Fee estimation failed. Fallback fee is disabled. Wait a few blocks or enable -fallbackfee. (code -4). Close SEND WALLET, and modify the shortcut, adding at the end:
–fallbackfee=0.00001 ( one more time, you have to add « – » two time before « fallback » )
If everything goes well, you should have something like this:
With another TXid because your transaction is not the same as mine.
With this method, you can now copy paste + enter at least 30 per 30 times (the mempool will block you with this message: Unconfirmed UTXOs are available, but spending them creates a chain of transactions that will be rejected by the mempool (code -4), so you will have to wait some time before sending again TX).
With this method you can ask ChatGPT to create you a script with “type keyboard up, then wait 1 sec, then enter, then wait 10 SEC in a loop. If you tune the 10 Sec you should be able to create automatically 200-1500 TX in one night, depending on how is the mempool.
Another solution is the TX function. TX function will create a number of transactions in one instruction. This is useful but sometimes, it will create just one or stop at a moment. TX instruction is:
tx ms7xsfsFPha9trZ5rcpCQ3xUeFS15R66vX 0.1 100 200
Where ms7xsfsFPha9trZ5rcpCQ3xUeFS15R66vX is my receiving address and 0.1 the amount to send, 100 the fees (SAT per VB, up this value if the mempool is flooded) and 200 the number of times to send this transaction. This should create 200 transactions. Be patient as this can stop and start.
If you do these methods with the Receiving Wallet, you will probably lose all you created UTXO, so it is better to really be careful about this.
The third method is still with the console, another command called Sendmany. Sendmany is used like this: sendmany “” “{\”XXXXXXXXXXXXXXXXX\”:0.1,\”XXXXXXX\”:0.1}”, where XXXX are different receiving addresses. You will probably need the –fallbackfee=0.00001 again to use this. Using this method is useful because it can lower the fee (but to be lower than the TX command you need at least 1000 receiving addresses that can be done with a script and ChatGPT typing keyboard automatically).
Note: The way we design THA is a way where the mempool is not flooded and the Fees very low. If, in the future the fees go high, we will help you more with “sendmany” as an automatic function can adjust this to have the lowest fees possible.
Another method is the “raw tx process” and this for people that are kind with CMD and not useful there. If you need help with sendmany and raw, you should not use them as you can lose all your THA on Fees.
Now you can wait X minutes or hours the time the SEND wallet sends all transactions to the Receiving wallet.
You can go to the RECEIVE wallet and check your incoming transactions. YOU can go to « Transaction »:
Or in « Send », « Inputs »:
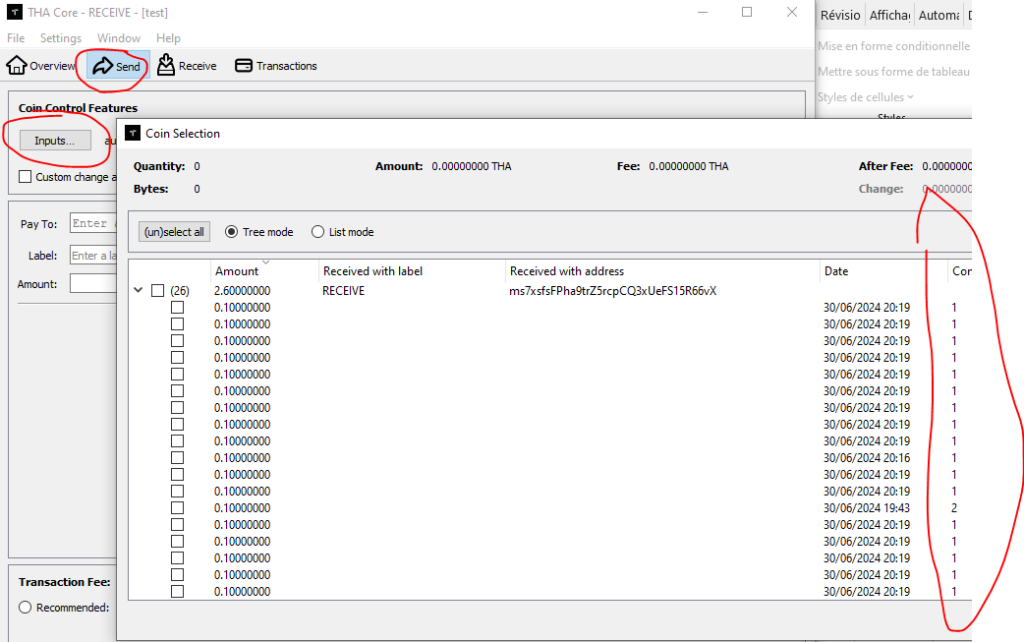
And just wait 10 confirmations, or more.
As you know we focused on ecosystem and users when we created THA, and when the time to secure the validation came, we chose a very high level of validation (10 Confirmations). 6 is considered as secured and this number is exponential. We can say that 10 is like 10 000 times more secure than 6.
You have at least one TX with 10 validations? The time to mine has arrived!!
Starting the Mining
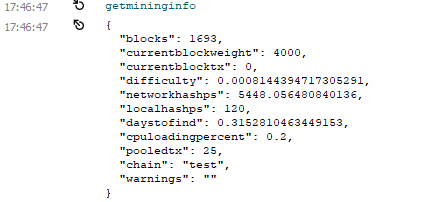
Still on the receive wallet; in Console. Just write « Generate ». The mining has begun:

You can check with « getmininginfo » input in console your stats:
Gretting you mine !
Note: Using create wallet many times on the same wallet instance will conduce to many problems as the wallet selector in the console is not totally made for this. Don’t use this feature or DYOR.
You hit a block? Greetings! But now the task needs all your attention. As still you do nothing you risk nothing, so be 100% sure you understand the next tutorial before beginning.
Handling Block Rewards
You have to send the coin from RECEIVE (mining wallet) to the SEND one, in order to create new UTXO. If you just send the coin you will destroy all your UTXO so one more time be very careful about this step.
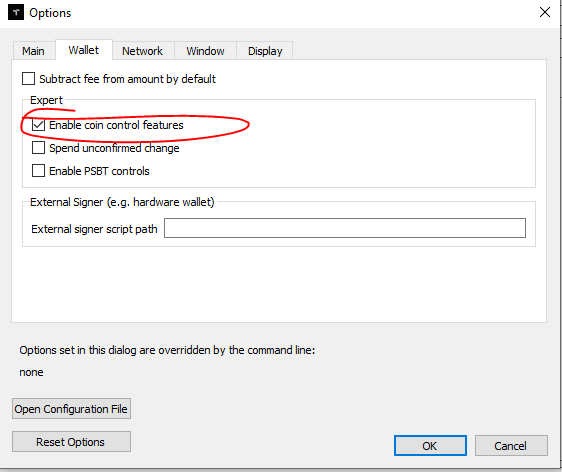
In order to not destroy your minable UTXO you have to send the Block coin you hit, and nothing else. This can be done with a tool called coin control. On the Receive wallet, go to settings, and in the Wallet tab. Enable “Enable coin control feature” and OK. If it was already selected you can cancel.
You can now aceed to « Inputs » button on the « send » area.
Clic Inputs,
Select the line of the block you hit (sorry I have no block hit so I selected a line):
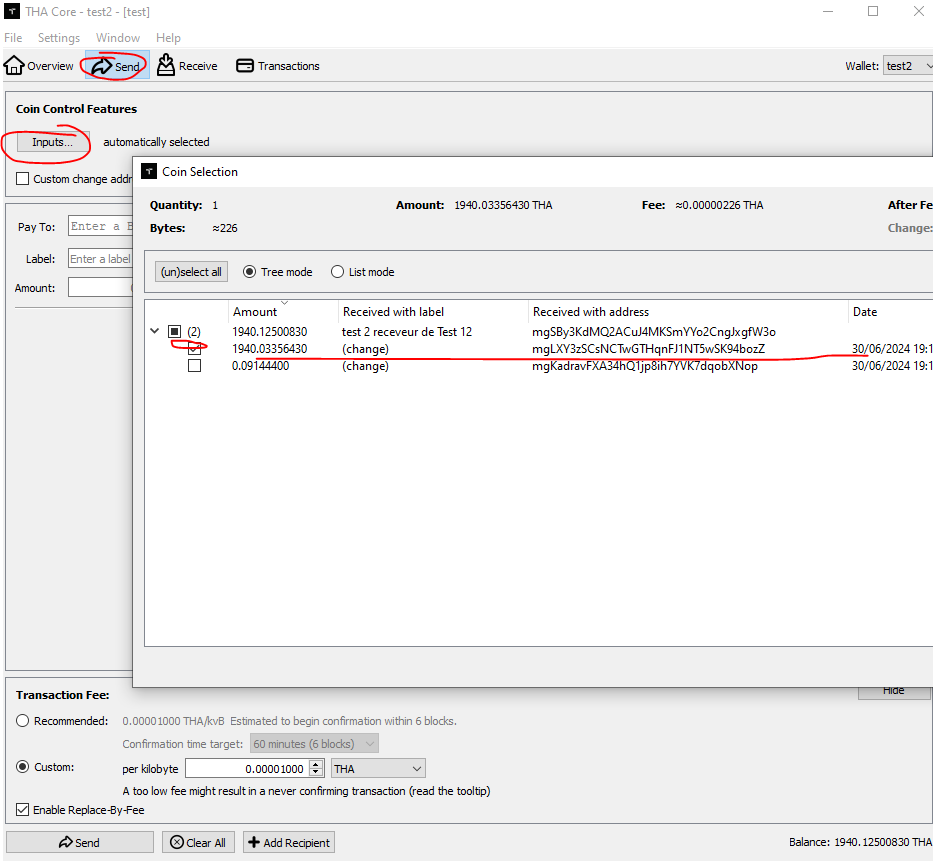
Then click OK and now you are only sending the selected lines (it can be a block or another big amount you want to transfer for creating UTXO or anything else).
In the send area, select Subtract fee from the amount” or it will use your UTXO to pay it. Select Recommended on transaction Fees as you probably don’t want to wait too much to create your UTXO and increase your hashrate.
In the receiving address, add the SEND wallet address.
Triple check what you do and send it.
Now you just have to go to your SEND wallet and wait only 1 validation to send in small portions of 0.1 back to the mining ( RECEIVE ) address.
I made this tutorial in real-time so if you just follow the step you will not have any issues. Change anything and you could lose fees, UTXO, time, or THA. Don’t hesitate to ask in the discord for help.
Important Tips and Warnings
- UTXO Management: Mismanaging UTXOs can lead to loss of fees, UTXOs, time, or THA
- Wallet Usage: Use separate wallets for mining and other transactions
- Transaction Fees: Adjust transaction fees according to the mempool status
- Support: Join the THA Discord for help if needed
The THA team.