Welcome to the full auto mode of THA which will help you set up the full automatic mode, now without any CMD line, on your THA wallet.
Create a Folder: Create a folder near the root of your PC, e.g.,
C:/autotha/. orC:/autotha2/or aC:/autotha3/…Copy Wallet Files: Go to your RECEIVE wallet folder and copy the entire wallet folder to
/autotha/.Download Latest Wallet: Download the latest version of the wallet here and copy the 4 files into your
/autotha/folder.Create Shortcut: Create a shortcut for RECEIVE as you did for the mining wallet. Right-click on
THA-QT,create a shortcut, and add
--datadir=C:/autotha/(replace with your new folder path) in the shortcut properties.Test Wallet: Test your wallet by double-clicking on your shortcut. Enable the RPC option in settings and restart it. Ensure your antivirus is okay and add exceptions for
THA CLIorTHA QTif necessary.Step 7: Set Up RPC User and Password
Go to Settings > Main > Open Configuration File. The wallet will open a text editor (usually Notepad) where you can add the following parameters:
rpcuser=RPC_USER
rpcpassword=RPC_PASSWORD
rpcport=8332And setup RPC_USER and RPC_PASSWORD , example :
rpcuser=Emeric
rpcpassword=58qsd-*/fqdyfgzsfqsf
rpcport=8332Save the file and restart your wallet.
Step 8: Download and Set Up Script
Download the script here and copy the file to the
/autotha/folder. Create a.yamlfile with the following content: ( the name fo your folder can be another name if you setup another name in STEP1 ).yaml
commands:
daemon_cli: "./tha-cli"
data_dir: ‘C:\Users\XXXXXXXXXXXXXXXXXXXXXXXXXXXXXXXXXXXXXXXX\AUTOTHA2\receive’
logging:
level: 'info'
rpc:
host: "http://localhost:8332"
user: "RPC_USER"
password: "RPC_PASSWORD"
wallet_name: "" #optional - exclude it if you use only 1 loaded wallet
auto_runner:
addresses_file: "" #optional - if you want to use an existing file. otherwise it will create one for you with addresses fetched from the daemon
addresses_count: 500 #optional - how many addresses to use when creating UTXOs
utxos_interval: 2 #optional, interval to run the utxo create in minutes
utxos_fee: 0.001Alternatively, download and modify the file here. You can use Sublime Text or Visual Studio Code to edit YAML files. Make sure to save the file in YAML format. Replace
RPC_USERandRPC_PASSWORDwith the ones you set earlier.user: « RPC_USER«
password: « RPC_PASSWORD«For example:user: « Emeric«password: « 58qsd-*/fqdyfgzsfqsf«Also, update thehostline:host: « http://localhost:8332 »And the line : » data_dir: ‘C:\Users\XXXXXXXXXXXXXXXXXXXXXXXXXXXXXXXXXXXXXXXX\AUTOTHA2\receive' » Per the PATH of your RECEIVE folder ( same as the shortcut you created step 5)Then save the file on your computer.Tips : copy past for password, and choose a very strong password, same for path, just right clic on the folder in the explorer of windows and select « copy path »Step 9: Place Config and Script Files
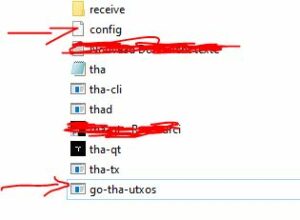
Place the
config.yamlandgo-tha-utxosfiles in your QT folder.
Step 10: Run the Script
Right-click the script and run it as an administrator. If your antivirus detects it as a false positive, add the script to the exceptions list.
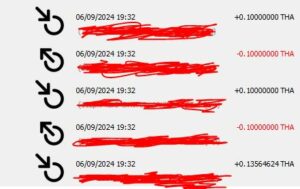
Wait two minutes, then check for THA transactions being created. You should see them in your wallet and in the script window.

Step 11: Fund Your Wallet (Optionnal)
Purchase some THA or wait for the next mined block. You will need THA to create UTXOs for POS mining, and you can’t mine without it. You can see the generated UTXO in many windows , this one is the more used :


and in the script window :

Step 11: Fund Your Wallet
Purchase some THA or wait for the next mined block. You will need THA to create UTXOs for POS mining, and you can’t mine without it.
Step 12: Activate Mining
Activate mining in the wallet.

If you close the script window, the script will stop running. If you close the wallet, both mining and UTXO creation will stop.
Debug Note
Sometimes, older versions of Windows may require you to replace the
"with'in the YAML file. So, if you encounter issues, try changing this line:"daemon_cli": "./tha-cli"to:
'daemon_cli': './tha-cli.exe'This should resolve potential conflicts with how older systems handle quotation marks in YAML files.
