I am a new user (go to the second guide if you already are mining THA) :
NOTE: Do not load or create more than one wallet per QT (STEP 5). Loading multiple wallets or creating multiple wallets can cause issues. Instead, create shortcuts or instances via CLI, but never generate more than one wallet in QT.
Introduction
Welcome to the « How to Mine » tutorial for THA. First of all, please take the time to read the complete tutorial. Not fully understanding what you are doing may lead to the loss of UTXOs. Losing UTXOs means you will have to send a transaction again to generate new UTXOs, which could lead to losing the associated fees.
Proof of Transaction (POT) Model
In the Proof of Transaction (POT) model, mining involves the interaction between two distinct addresses: a sender address and a receiver address. To mine effectively using POT, you need to set up both addresses. The sender address initiates transactions by sending digital assets to the receiver address. These transactions are then validated and recorded on the blockchain, contributing to your mining efforts. The process relies on the volume and frequency of transactions between these two addresses to increase mining power. By maintaining this active flow, you essentially boost your mining potential, utilizing the inherent capabilities of the POT mechanism.
We’ve introduced a fully automated mode that will handle creating new transactions for you whenever possible, such as when you hit a block or receive new funds.
To simplify: You need to send THA to yourself to create transactions that the blockchain will use for POS, enabling you to mine. Initially, users had to do this manually, but now we are introducing a fully automated process that will handle it for you. You can buy /sell THA coin there : NONKYC
Our mechanism will scan all your receiving addresses in the wallet to check if it’s possible to generate new transactions, and it will do so automatically. You just need to create the wallet, set up the user/password data, and copy it into the CONFIG file.
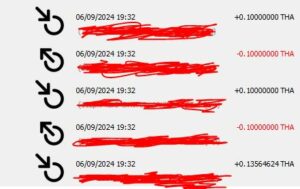
Your coins will remain available after this process; your total amount of THA will simply be divided into smaller transactions of 0.1 THA. However, you can still access and send them at any time.
Step-by-Step Mining Guide
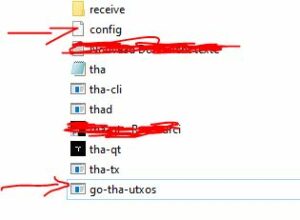
Step 1- Create a Folder: Create a folder near the root of your PC, e.g., C:/autotha/ or C:/autotha2/ .
Step 2- Download Latest Wallet: Download the latest version of the wallet here and copy/extract the 4 files into your /autotha/ folder.
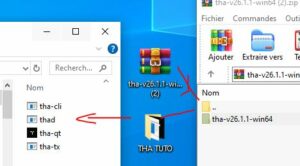
Step 3 – Run THA QT: Click on THA-QT:

and if necessary, authorize Windows Defender or your antivirus to run THA.
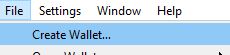
Step 4- Create a Wallet and name it. Do not create more than one wallet, as it can cause issues (we are working on fixing this). A single wallet is enough for mining.
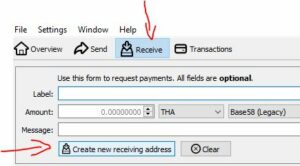
Step 5- Create a receiving adress,
Go to Receive, then click Create New Receiving Address.
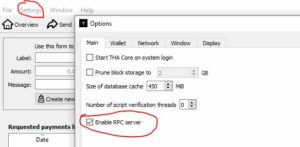
Step 6: Enable the RPC Option
Go to Settings > Main, enable RPC, and restart the wallet. If necessary, add exceptions for THA CLI or THA QT in your antivirus settings.
Step 7: Set Up RPC User and Password
Go to Settings > Main > Open Configuration File. The wallet will open a text editor (usually Notepad) where you can add the following parameters:
rpcuser=RPC_USER
rpcpassword=RPC_PASSWORD
rpcport=8332
And setup RPC_USER and RPC_PASSWORD , example :
rpcuser=Emeric
rpcpassword=58qsd-*/fqdyfgzsfqsf
rpcport=8332
Save the file and restart your wallet.
Step 8: Download and Set Up Script
Download the script here and copy the file to the /autotha/ folder. Create a .yaml file with the following content: ( the name fo your folder can be another name if you setup another name in STEP1 ).
yaml
commands:
daemon_cli: "./tha-cli"
logging:
level: 'info'
rpc:
host: "http://localhost:8332"
user: "RPC_USER"
password: "RPC_PASSWORD"
wallet_name: "" #optional - exclude it if you use only 1 loaded wallet
auto_runner:
addresses_file: "" #optional - if you want to use an existing file. otherwise it will create one for you with addresses fetched from the daemon
addresses_count: 500 #optional - how many addresses to use when creating UTXOs
utxos_interval: 2 #optional, interval to run the utxo create in minutes
Alternatively, download and modify the file here. You can use Sublime Text or Visual Studio Code to edit YAML files. Make sure to save the file in YAML format. Replace RPC_USER and RPC_PASSWORD with the ones you set earlier.
user: « RPC_USER«
host line:Step 9: Place Config and Script Files
Place the config.yaml and go-tha-utxos files in your QT folder.
Step 10: Run the Script
Right-click the script and run it as an administrator. If your antivirus detects it as a false positive, add the script to the exceptions list.
Wait two minutes, then check for THA transactions being created. You should see them in your wallet and in the script window.

Step 11: Fund Your Wallet
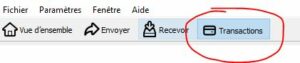
Purchase some THA or wait for the next mined block. You will need THA to create UTXOs for POS mining, and you can’t mine without it. You can see the generated UTXO in many windows , this one is the more used :
and in the script window :

Step 11: Fund Your Wallet
Purchase some THA or wait for the next mined block. You will need THA to create UTXOs for POS mining, and you can’t mine without it.
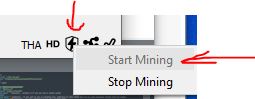
Step 12: Activate Mining
Activate mining in the wallet.
If you close the script window, the script will stop running. If you close the wallet, both mining and UTXO creation will stop.
Debug Note
Sometimes, older versions of Windows may require you to replace the " with ' in the YAML file. So, if you encounter issues, try changing this line:
"daemon_cli": "./tha-cli"
to:
'daemon_cli': './tha-cli.exe'
This should resolve potential conflicts with how older systems handle quotation marks in YAML files.
——————————————-
Readme :
Here is the corrected version of your tutorial:
—
**I am a new user (go to the second guide if you are already mining THA):**
**NOTE:** Do not load or create more than one wallet per QT (Step 5). Loading multiple wallets or creating multiple wallets can cause issues. Create shortcuts or instances via CLI, but never generate more than one wallet in QT.
### Introduction
Welcome to the « How to Mine » tutorial for THA. First of all, please make sure to read the entire tutorial. Not understanding what you are doing may result in the loss of UTXOs. Losing UTXOs means you will need to send another transaction to get new UTXOs, incurring additional fees.
### Proof of Transaction (POT) Model
In the Proof of Transaction (POT) model, mining involves the interaction between two distinct wallets: a sender address and a receiver address. To mine effectively using POT, you need to set up both addresses. The sender address initiates transactions by sending digital assets to the receiver address. These transactions are then validated and recorded on the blockchain, contributing to your mining efforts. The process relies on the volume and frequency of transactions between these two addresses to increase mining power. By maintaining this active flow, you can effectively boost your mining potential, utilizing the inherent capabilities of the POT mechanism. We have set up a fully automated mod that will handle the creation of new transactions for you whenever possible, such as when you hit a block or receive new funds.
Our mechanism will scan all your receiving addresses in the wallet to determine if it is possible to generate new transactions, and it will do so automatically. You just need to create the wallet, set the user/password data, and copy it into the CONFIG file.
Your coins will still be available after this process; your amount of THA will just be divided into small transactions of 0.1 THA, but you can still access them and send them at any moment.
### Steps to Mine THA
1. **Create a Folder:** Create a folder near the root of your PC, e.g., `C:/autotha/` or `C:/autotha2/`.
2. **Download the Latest Wallet:** Download the latest version of the wallet [here](insert link) and copy/extract the four files into your `/autotha/` folder.
3. **Run THA QT:** Click on `THA-QT`:
– If prompted, allow Windows Defender or your antivirus to run THA.
5. **Create a Wallet and Name It:** Do not create more than one wallet; doing so will cause problems (we are working on fixing this) with mining.
6. **Create a Receiving Address:** In the « Receive » section, create a new receiving address.
7. **Enable the RPC Option:** Go to `Settings` > `Main` and enable the RPC option, then restart the wallet. Ensure your antivirus is okay with this and add exceptions for `THA CLI` or `THA QT` if necessary.
8. **Set Up RPC User and Password:**
– Go to `Settings` > `Main` > `Open Configuration File`.
– The wallet will open your text editor (usually Notepad) and allow you to add parameters. The initial file is blank. Add the following:
« `
paytxfee=0.001
rpcuser=RPC_USER
rpcpassword=RPC_PASSWORD
« `
– Replace `RPC_USER` and `RPC_PASSWORD` with your chosen values. For example:
« `
paytxfee=0.001
rpcuser=Emeric
rpcpassword=58qsd-*/fqdyfgzsfqsf
rpcport=8332
« `
– Save the file and restart your wallet.
9. **Download and Set Up Script:** Download the script [here](insert link) and copy the file to the `C:/autotha/` folder (the folder name can be different if you set a different name in Step 1). Create a `.yaml` file with the following content:
« `
commands:
daemon_cli: « ./tha-cli »
logging:
level: ‘info’
rpc:
host: « http://localhost:8332 »
user: « RPC_USER »
password: « RPC_PASSWORD »
wallet_name: « » #optional – exclude if you use only one loaded wallet
auto_runner:
addresses_file: « » #optional – if you want to use an existing file. Otherwise, it will create one for you with addresses fetched from the daemon
addresses_count: 500 #optional – how many addresses to use when creating UTXOs
utxos_interval: 2 #optional, interval to run the UTXO creation in minutes
« `
– Alternatively, download and modify the file [here](insert link). We suggest using Sublime Text to modify YAML files or using ChatGPT/Copilot/Claude AI (they will save the file in the correct YAML format).
– Change these lines according to the previous setup:
« `
user: « RPC_USER »
password: « RPC_PASSWORD »
« `
– With the example provided, it would become:
« `
user: « Emeric »
password: « 58qsd-*/fqdyfgzsfqsf »
« `
– Then save the file on your computer.
– Also, change the host with this line:
« `
host: « http://localhost:8332 »
« `
**Tip:** Copy and paste the password, and choose a very strong password.
10. **Place `config.yaml` and `go-tha-utxos`:** Place these files in your QT folder.
11. **Launch the Script:** Right-click and run the script as an administrator.
– Add the script as an exception if your antivirus detects it as a false positive.
– Wait 5 minutes and check for THA utilization; you will see transactions created in the script window.
12. **Fund Wallet:** Purchase some THA or wait for the next mined block, as you need THA to create UTXOs for POS usage, and you won’t mine without it.
13. **Activate Mining:** Activate mining on the wallet. Keep the old folder as a backup.
– If you close the script window, the script will stop running. If you close the wallet, neither mining nor UTXO creation will continue.
I already am minnig THA :
1- Create a Folder: Create a folder near the root of your PC, e.g., C:/autotha/.
2- Copy Wallet Files: Go to your RECEIVE wallet folder and copy the entire wallet folder to /autotha/.

3- Download Latest Wallet: Download the latest version of the wallet here and copy the 4 files into your /autotha/ folder.
4 – Create Shortcut: Create a shortcut for RECEIVE as you did for the mining wallet. Right-click on THA-QT,

5-
6 -Test Wallet: Test your wallet by double-clicking on your shortcut. Enable the RPC option in settings and restart it. Ensure your antivirus is okay and add exceptions for THA CLI or THA QT if necessary.
7- Download and Set Up Script: Download the script here and copy the file to the C:/autotha/ folder. Create a .yaml file with the following content:
yaml
commands:
  daemon_cli: './tha-cli.exe'
  data_dir: 'C:/YOUR_THA_DATA_DIR'
  logging:
    level: 'info'
Alternatively, download and modify the file here. Ensure the data_dir is the RECEIVE folder, not the one containing autotha.
8 – Run Commands: Copy the C:/autotha/ path for later use. Open a command prompt as an administrator, navigate to the autotha folder using cd and paste the path. Run the following commands:
go-tha-utxos.exe addresses collect --count 250 --file addresses.json
If it doesn’t work, check antivirus settings and paths.
9- Create UTXOs: In the admin CMD, run:
go-tha-utxos.exe utxos create --file addresses.json --interval 5 --fee 0.001
Wait 5 minutes and check for THA utilization.
10- Fund Wallet: Purchase some THA or wait for the next mined block.
11- Activate Mining: Activate mining on the wallet. Keep the old folder as a backup.